Introduction
Line styles in Revit play a critical role in defining the appearance of lines in your projects, influencing both the readability and professionalism of your drawings. However, manually adding or updating line styles can be a cumbersome and time-consuming task. This article explores how to use Dynamo in conjunction with Excel to efficiently add Revit line styles in bulk, automating and simplifying this process.
Importance of Line Styles
Line styles are essential for:
Differentiating between various elements and categories
Maintaining uniformity and clarity in project documentation
Ensuring adherence to project standards Proper line styles improve the overall quality and readability of your Revit drawings, making them easier to interpret and work with.
Challenges in Adding Line Styles
Manually adding or updating line styles in Revit can be challenging due to:
The repetitive nature of the task
The potential for human error
The complexity of navigating through Revit's settings These challenges often lead to inefficiencies and inconsistencies, which can undermine the quality of the final output.
Introducing Dynamo and Excel
Dynamo is a powerful visual programming tool for Revit, enabling users to create scripts that automate tasks. By integrating Dynamo with Excel, users can leverage the power of spreadsheet data to streamline the addition of line styles in Revit.
Common Use Cases
Setting Up Initial Line Styles
When starting a new project, the script can be used to quickly set up all necessary line styles, saving time and effort.
Making Bulk Updates
For ongoing projects, the script allows for bulk updates to line styles, ensuring that changes are applied uniformly and consistently.
Ensuring Consistency Across Projects
By using the script, firms can ensure that all projects adhere to the same line style standards, maintaining consistency and professionalism.
Example Use Cases
Example: Adding Line Styles for a New Project
For a new project, you can prepare an Excel file with the desired line styles and their properties. The Dynamo script will read this data and automatically add the line styles to the project.
Example: Updating Line Styles in Existing Projects
For existing projects, the script can be used to update or add new line styles based on updated standards or requirements.
Example: Standardizing Line Styles Across Multiple Projects
The script can also be used to standardize line styles across multiple projects, ensuring consistency and compliance with firm-wide standards.
Benefits of Using Dynamo with Excel
Streamlined Workflow
Using Dynamo with Excel simplifies the process of adding line styles, allowing for bulk changes to be made quickly and efficiently.
Automation of Repetitive Tasks
Automating the task of adding line styles reduces the risk of errors and frees up time for more critical project activities.
Improved Accuracy and Consistency
The integration ensures that changes are applied uniformly across all models, maintaining consistency and precision in your drawings.
Setting Up the Environment
Required Tools and Software
To get started, you will need:
Revit (compatible with Dynamo)
Dynamo (installed and configured within Revit)
Microsoft Excel (to prepare and manage line style data)
Installing Dynamo, Dynamo Packages and Configuring Excel
Ensure that Dynamo is installed and properly configured within your Revit environment. Prepare your Excel spreadsheet with the line style data, including columns for line style names, colors, and weights.
The only package you need for this script is bimorphNodes. I used version 5.1.3
Creating the Dynamo Script
You can create this yourself, or just download the script at the bottom of the page.

Script Workflow Logic
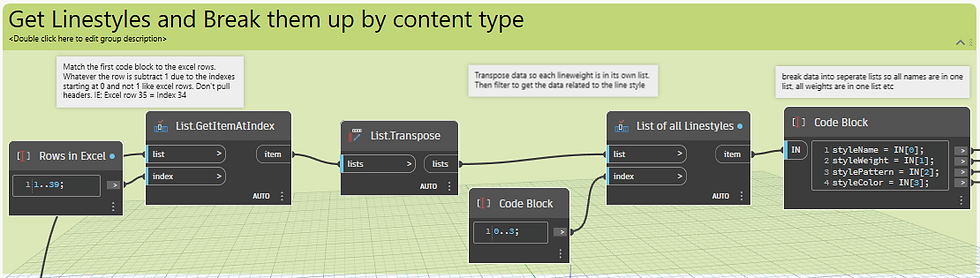
Import Excel File & Read Sheet: the excel file has to be formatted properly for this script to work the way it was intended.
Parse excel data by content type and assign to lists with variables: take the excel data and combine the like types to create lists that we can use for import. All the line names, weights, colors and patterns will be assembled to their own list but hold their same index value so they can be assimilated at the end of the script
Translate the excel color and line pattern from text strings to actual Revit elements: The text values in the name and the integer values in the line weight projects can remain exactly how they are because that's what the end node expects. The other two values, color and pattern, need to be translated into something Revit understands. So we assign the lists to variables and make 'if' statements that translate the data into something Revit can understand.
Convert old line styles to new ones: use pyRevit to convert existing line styles to the newly create line styles if necessary.
if statement example spelled out: if an item in the list contains the value "DASH 1X" assign it to the Line Pattern Revit element that was put into the DASH1X variable.

Detailed Walkthrough
Importing Data from Excel

Importing data from Excel involves:
Setting up the Excel file with the required data in the required format
Using Dynamo's Data.ImportExcel node to read the data
Parsing the data into a format that Dynamo can work with
null is translated to be a solid line.
halftone is translated to be grey

Parse Data into Like-Types
Parsing Data involves:
Getting the excel data, but not the headers
Transposing the list to combine the data into lists (getting all the names in one list, the weights in one list, etc)
Then the lists are separated and we can extract them based on their index values
Mapping Excel Data to Revit Line Styles
Mapping data involves:
Identifying the relevant nodes in Dynamo for Revit line styles - patterns and colors
Connecting the imported data to these nodes by assigning the list and the dynamo nodes to variables
Iterate the list through if statements to assign the excel data to the dynamo data
customize the inputs and variables to align with the colors and patterns you need
Line Patterns:
// match excel data to revit elements
DASH1X;
DASH2X;
DASHDASH2X;
DASHDASH4X;
// list of line patterns above;
list;
inputLinePattern = list;

// Choose the variable based on input name using if statements
// Variable in quotes comes from exvel file.
// Variable after comes from input above
output = inputLinePattern == "DASH 1X" ? DASH1X :
         inputLinePattern == "DASH 2X" ? DASH2X :
         inputLinePattern == "DASH DASH 2X" ? DASHDASH2X :
         inputLinePattern == "DASH DASH 4X" ? DASHDASH4X :
         inputLinePattern == "null" ? null : null;

 // default to null if none match. null = solid line pattern;
output;
Line Colors:
// convert excel color text to revit elements
red;
blue;
black;
grey;
green;
// list all colors above
list;
inputColor = list;

// Choose the variable based on input color using if statements
output = inputColor == "red" ? red :
         inputColor == "blue" ? blue :
         inputColor == "black" ? black :
         inputColor == "green" ? green :
         inputColor == "halftone" ? grey : black;
// default to black if none match;
output;
Convert Old Line Styles to New Line Styles:
If you have existing line styles that you want to migrate into the new line styles, use pyRevit to convert line types!

Advanced Customization
Customizing the Script for Specific Needs
Advanced users can customize the script to meet specific requirements, such as adding conditional logic or handling unique data sets.
Adding Conditional Logic
Conditional logic can be used to apply different line styles based on specific criteria, enhancing the script's flexibility and utility.
Handling Large Data Sets
For large projects with extensive line style data, the script can be optimized to handle large data sets efficiently, ensuring smooth and error-free execution.
Downloading and Using the Script
Accessing the Script
You can download this dynamo script and excel template file if you sign up for my newsletter. I promise to only provide valuable content and never spam. I hate spam...
Installation and Configuration Guide
Download the Dynamo Script & Excel Template: Obtain the zip package from the my site.
Edit the Excel Sheet: Make the changes to the excel sheet as necessary
Add to Dynamo: Open the script into Dynamo.
Configure Settings and mappings: Adjust the line patterns and colors as needed
Run the Script: Execute the script within Dynamo to apply the changes.
Troubleshooting and Support
Common Issues and Solutions
Common issues may include data import errors or mapping. Most issues can be resolved by ensuring that the Excel data is correctly formatted and that Dynamo is properly configured. If the dynamo script has errors, address those.
Getting Help and Additional Resources
For additional support, users can refer to online forums, tutorials, or reach out to me directly via the contact form on this website.
FAQ Section
What is Dynamo? Dynamo is a visual programming tool for Revit that allows users to create scripts to automate tasks and enhance Revit's functionality.
How do I link Excel to Dynamo? You can link Excel to Dynamo using Dynamo's built-in Excel nodes, which allow you to read and write data between Excel and Revit.
Can the script handle multiple line styles at once? Yes, the script is designed to handle multiple line styles simultaneously, making bulk updates easy and efficient.
What are the system requirements? Users need Revit, Dynamo, and Excel installed on their systems. The specific versions of Revit and Dynamo should be compatible with each other.
Is there a risk to my Revit models? The script has been thoroughly tested to ensure it does not harm existing models. However, it is always advisable to back up your work before making significant changes.
How often should the script be updated? The script should be updated regularly to ensure compatibility with new versions of Revit and to incorporate user feedback and improvements.
Conclusion
Using Dynamo in conjunction with Excel to add Revit line styles in bulk is a game-changer for architects, engineers, and BIM managers. This approach not only streamlines the process but also ensures accuracy and consistency across projects. Download the script today and revolutionize how you manage line styles in your Revit projects.
Comments